In summary:
- Treat your car’s load as a system for safety and comfort, not just a container to be filled.
- Prioritize weight distribution over simply maximizing space; heavy items should be low and central.
- Implement a tiered accessibility plan to keep essentials handy and avoid unpacking chaos.
- Use modular packing for clothing and gear to adapt to changing needs and climates on the road.
- Remember that a well-packed car is a safer car, impacting everything from braking to driver visibility.
The scene is familiar to any road tripper with a compact vehicle: a mountain of gear, a small car trunk, and the sinking feeling that you’re about to lose a very frustrating game of Tetris. The classic advice rings in your ears: “pack light,” “use packing cubes,” “be ruthless.” While well-intentioned, this advice often misses the bigger picture. Packing a small car for a long-haul journey, like a cross-country trip across the USA, isn’t just about what you leave behind. It’s a science of ergonomics, physics, and strategy.
The common approach focuses on cramming as much as possible into every available inch. We celebrate a trunk that closes, even if the first aid kit is buried under three suitcases and a cooler. But what if the true key to a comfortable and successful road trip wasn’t just fitting everything in, but arranging it with the precision of an engineer? The secret lies in shifting your mindset: stop treating your car like a storage unit and start treating it as a high-performance system where every item’s placement impacts balance, safety, and your sanity.
This guide moves beyond the basics. We’ll explore how to strategically manage your vehicle’s dynamics through proper weight distribution, how to design an accessibility system that keeps you from tearing the car apart at every stop, and how to create a comfortable living space for passengers, even when you’re thousands of miles from home. It’s time to stop packing and start engineering your journey.
This article will provide a complete framework for loading your vehicle. By following these structured steps, you will transform your packing process from a source of stress into a strategic advantage for your trip.
Summary: How to Pack a Small Car for a Long Trip
- Understanding weight distribution
- The mistake of emergency inaccessibility
- Optimizing passenger space
- Comparing external storage solutions
- Planning clothing rotation
- Optimizing tire pressure for the load
- Adapting your load to shifting micro-climates
- Anticipating the unexpected to stay safe on the road
Understanding weight distribution
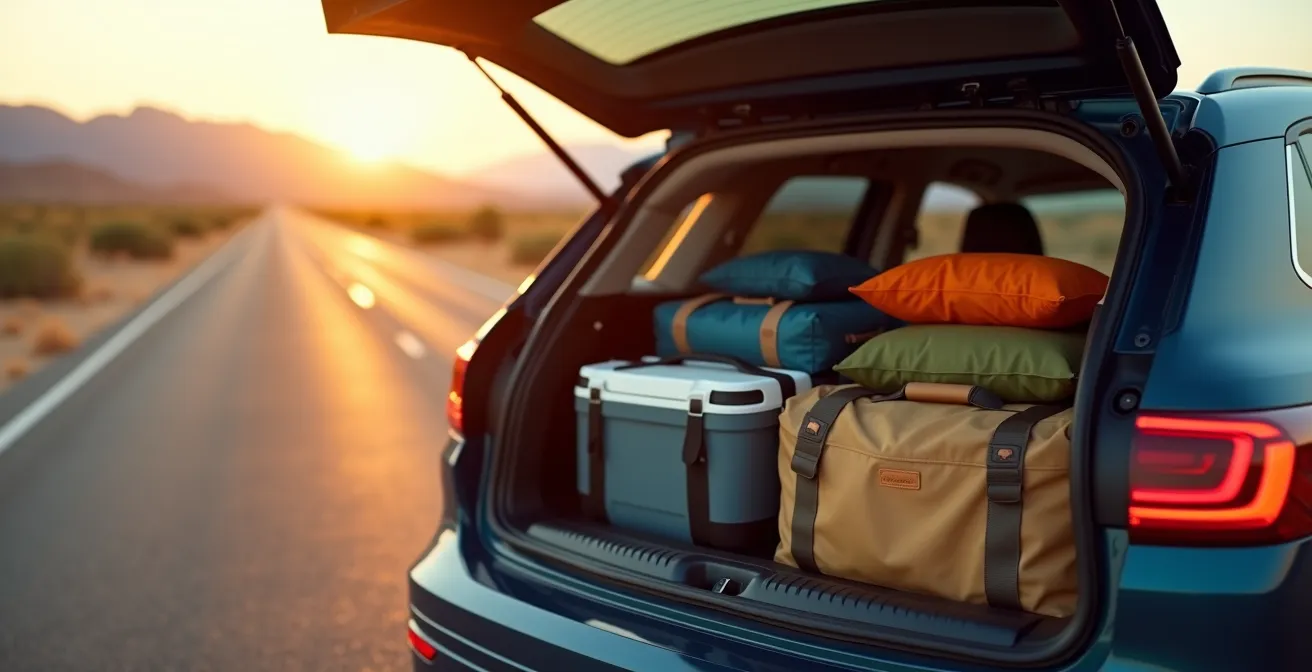
The single most overlooked aspect of packing is not space, but physics. Where you place an item is far more important than how much space it takes up. Improper weight distribution can negatively affect your car’s handling, increase braking distance, and even lead to instability in emergency maneuvers. The goal is to keep the car’s center of gravity as low and as centered as possible. This means the heaviest items should not just be at the bottom, but also positioned correctly relative to the vehicle’s axles.
A common mistake is loading heavy items like coolers or gear boxes at the very back of the trunk. This creates a pendulum effect, making the steering feel light and the rear end unstable. Instead, think in terms of zones. As a foundational principle, your heaviest gear should be placed as close to the center of the vehicle as possible, ideally over or just in front of the rear axle. According to engineering tests that show a 1,000kg load positioned correctly can dramatically improve vehicle stability, it’s clear this isn’t just theory. For a passenger car, this translates to placing heavy suitcases and coolers low and pushed up against the back of the rear seats, not near the tailgate.

To implement this, adopt a vehicle zoning system. This structured approach removes guesswork and ensures optimal balance:
- Zone 1 (Axle Zone): Place the heaviest items, such as coolers, heavy equipment, and liquid containers, directly over or just ahead of the rear axle. This is the foundation of your load.
- Zone 2 (Mid-Car Zone): Position medium-weight items like suitcases and duffel bags in the middle section of your storage area.
- Zone 3 (Top/Side Zone): This area is reserved for the lightest and most compressible items—think pillows, sleeping bags, coats, and blankets.
Crucially, you must also distribute weight evenly from side-to-side to prevent vehicle instability. Finally, a non-negotiable rule for safety is to keep all items below the window level to maintain clear driver visibility through the rear and side windows.
The mistake of emergency inaccessibility
You’ve perfectly balanced your vehicle’s load, but 200 miles into your trip, you need a band-aid. Or worse, your “check engine” light comes on. Is your first aid kit or basic tool set buried at the bottom of Zone 1? This is the critical error of emergency inaccessibility. A perfectly packed car is useless if you have to unpack the entire vehicle on the side of the highway to access a critical item. The solution is to think in accessibility tiers, a system that prioritizes items based on how frequently or urgently you might need them.
This system goes beyond the simple advice to “keep essentials handy.” It forces you to define what “essential” means in different contexts: immediate, same-day, or at your next overnight stop. A well-executed strategy ensures that 90% of your on-the-road needs can be met without ever disturbing the main, balanced load in your trunk.
Case Study: The Three-Tiered Emergency Accessibility System
A proven method for long-distance travel involves dividing accessibility into three distinct tiers. As outlined by travel experts at AAA, the first tier is the Cabin Kit: items needed most often, like phone chargers, sunglasses, and addresses, should be in the front console. The second tier is the Immediate Access Zone, often the space beneath seats, perfect for items you might need quickly, such as a first aid kit or roadside emergency tools. The third tier is the Overnight Bag; if you plan to stop at a hotel, packing a single small duffel with one night’s worth of essentials for all passengers and storing it for easy retrieval prevents you from having to unpack the entire car.
To make this system second nature, you can practice a “90-second drill.” Can you locate your jumper cables, first aid kit, and a bottle of water within 90 seconds of stopping the car? If not, your tiered system needs refinement. This proactive approach turns a potential crisis into a minor inconvenience.
Optimizing passenger space
In a small car on a long trip, passenger space is not a luxury; it’s a critical component of everyone’s sanity and comfort. The cabin can quickly become a chaotic mess of snacks, cables, jackets, and empty water bottles, leading to stress and discomfort. The goal is to transform the passenger area from a dumping ground into a collection of organized, personal zones. This not only keeps the car tidy but also gives each passenger a sense of control and personal space, which is invaluable on a multi-day journey.
The first step is to reclaim underutilized areas. Don’t let footwells become a wasteland of discarded wrappers. By using soft, pliable bags and small containers, storage optimization experts have found that using footwells and under-seat areas can increase usable cabin space by up to 30%. These spots are perfect for day packs, a small cooler with drinks and snacks, or shoes that you’ve swapped out for driving slippers. It keeps the main seating area clear and uncluttered.
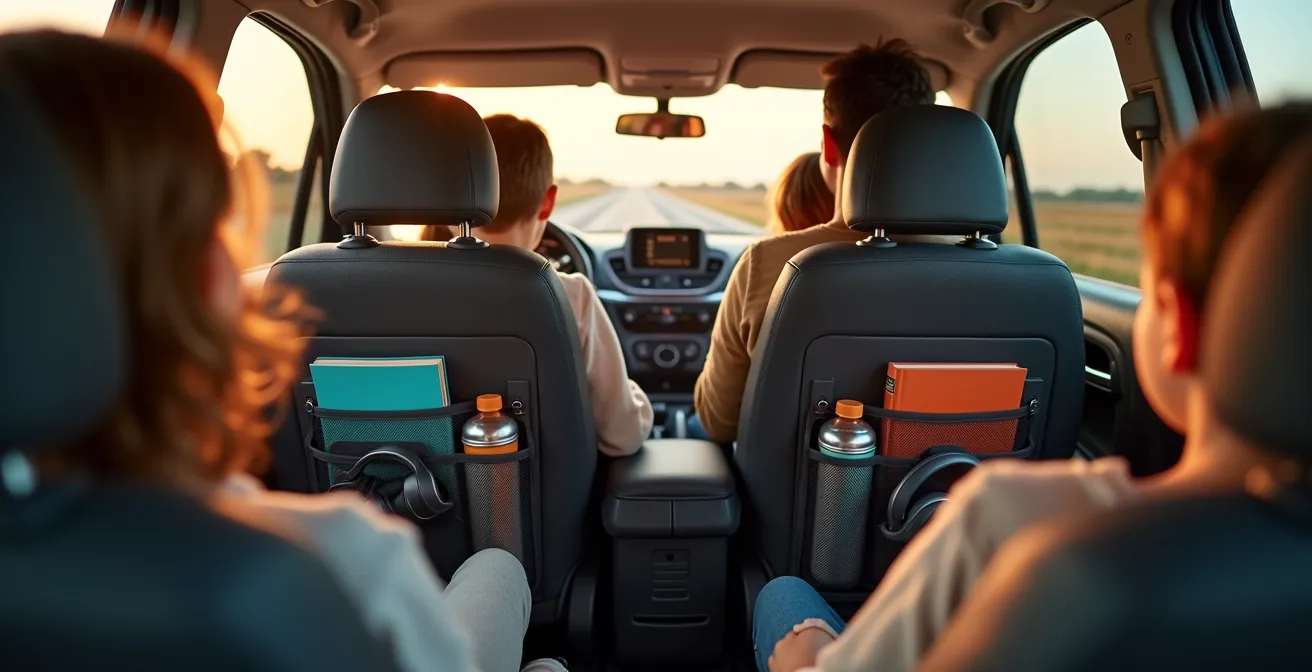
The next level of optimization is creating dedicated personal zones. This is where back-of-seat organizers become indispensable. They allow each passenger to have their own station with pockets for a water bottle, a book, headphones, and charging cables. This simple tool prevents the endless “can you pass me the…” requests and reduces clutter on seats and floors. For trips with kids, a “snackle box”—a craft organizer filled with a variety of snacks—can be a game-changer, providing choice and independence while containing messes.
By treating passenger space with the same strategic mindset as cargo space, you create a more harmonious environment. A comfortable passenger is a happy passenger, and on a long road trip, that is a resource more valuable than any amount of trunk space.
Comparing external storage solutions
Even with the most ingenious internal packing, the physical limits of a small car can be a hard reality. When your journey requires more gear than your car’s interior can safely and comfortably hold—think camping equipment, multiple bikes, or extended-stay luggage—it’s time to consider external storage. However, this decision isn’t as simple as just buying a roof box. Each type of external storage comes with its own set of trade-offs in terms of capacity, security, accessibility, and, most importantly, fuel economy and vehicle handling.
Choosing the right solution depends entirely on your specific needs. Are you making a single long drive to one destination, or will you be making multiple stops at hotels where you’ll need to access your gear? Is your cargo bulky but light, or heavy and dirty? Answering these questions will guide you to the most efficient and cost-effective option. It’s crucial to understand that any external addition will impact your car’s aerodynamics and, consequently, its fuel consumption. This impact should be factored into your total trip budget.
To aid in this decision, a direct comparison of the most common options is essential. The following table breaks down the key characteristics of hard-shell roof boxes, soft-sided roof bags, hitch-mounted racks, and trailers.
| Storage Type | Capacity | Fuel Impact | Best Use Case | Price Range |
|---|---|---|---|---|
| Hard-Shell Roof Box | 16-22 cubic feet | 10-15% MPG reduction | Multi-stop hotel trips, weatherproofing needed | $400-800 |
| Soft-Sided Roof Bag | 10-15 cubic feet | 8-12% MPG reduction | Single destination, temporary storage | $100-300 |
| Hitch-Mounted Rack | Up to 500 lbs | 5-8% MPG reduction | Heavy/dirty gear (bikes, generators) | $200-600 |
| Trailer | 50+ cubic feet | 15-25% MPG reduction | Extended trips, camping equipment | $500-2000 |
Ultimately, the best external storage solution is the one that best fits the gear you need to carry and the type of trip you are taking. A hitch rack is excellent for bikes but useless for clothing, while a roof box offers weatherproof security but can make your vehicle too tall for some parking garages. Choose wisely.
Planning clothing rotation
For a trip spanning multiple weeks and climates, clothing can become a primary source of chaos. The traditional method of packing one or two large suitcases quickly devolves into a messy dig for a clean pair of socks, disrupting your carefully balanced trunk in the process. The solution is a modular clothing system, which treats your wardrobe not as a single pile of clothes, but as a series of curated, time-based modules. This system is often powered by packing cubes, but its true genius lies in the planning that happens before a single item is packed.
The core concept is to pack for the immediate future while deep-storing the rest. Instead of a suitcase for “shirts” and another for “pants,” you create a packing cube for “Days 1-3” and another for “Days 4-6.” Each module contains everything you need for that period: tops, bottoms, underwear, and socks. When you start your trip, only the “Days 1-3” cube is in the accessible part of your car. The other modules are stored deep in the trunk, part of the stable base load you don’t need to touch.
Case Study: The Overnight Dash Bag Strategy
A critical component of the modular system is the “Overnight Dash Bag.” As detailed by experienced family road trippers, you’re not going to want to lug all your bags into a hotel for a single night’s stay. Instead, you pack one or two smaller bags with just the essentials everyone needs for that overnight stop: a change of clothes, toiletries, and pajamas. This bag is kept in the most accessible part of the car, allowing for a quick and easy transition from car to hotel room without having to disturb the rest of your meticulously packed vehicle.
This system also requires a dedicated strategy for laundry. A collapsible laundry hamper is a must-have. It keeps dirty clothes separate and contained. When positioning it in the car, remember to treat it like any other piece of luggage, placing it to maintain weight balance. As you do laundry on the road, you can repack a now-empty cube for the next leg of your journey, creating a perpetual, organized rotation.
Optimizing tire pressure for the load
You’ve masterfully distributed the weight in your car, created perfect accessibility tiers, and organized your passenger zones. But there’s one final, critical link in the safety and efficiency chain: your tires. A fully loaded car behaves very differently from an empty one, and your tires are on the front line of this change. Driving on improperly inflated tires, especially over long distances with a heavy load, is not just inefficient—it’s dangerous. According to automotive safety experts who warn that underinflated tires can lead to excessive heat buildup and increase the risk of a catastrophic blowout.
Most drivers check their tire pressure based on the recommendation for daily, unloaded driving. However, for a road trip, you must adjust for the added weight. Your vehicle has a specific recommended tire pressure for a full load, which is different from the pressure for normal operation. This information is typically found on a sticker on the driver’s side door jamb or in your owner’s manual. Setting your tires to this “loaded” pressure is a non-negotiable first step.
However, tire pressure is not a “set it and forget it” parameter. It is a dynamic variable affected by temperature and altitude. As you travel across the country, you will encounter significant changes in both. A 20°F change in ambient temperature or a 1,000-foot change in elevation can alter your tire pressure by several PSI. This requires a proactive approach to monitoring and adjusting your tire pressure throughout your journey.
Action Plan: The Pre-Trip Loading Audit
- Access Points: Identify all frequent-access items (water, snacks, first-aid) and map out where you’ll need them, assigning them to your in-cabin or immediate-access zones.
- Inventory & Grouping: Lay out all your gear and group it by weight (heavy, medium, light) and function (emergency, clothing, kitchen). This is your master inventory.
- Consistency Check: Cross-reference your packed gear against your itinerary. Do you have desert gear packed accessibly before you cross the Rockies? Eliminate redundant or “just-in-case” items that don’t serve a specific plan.
- Efficiency Drill: Review your accessibility plan. Can you locate and deploy your emergency kit in under 90 seconds? Is the overnight bag reachable without moving more than one other item?
- Implementation Plan: Create a prioritized loading order based on weight and access. Systematically replace single-purpose items with versatile, multi-use gear to fill any gaps.
Investing in a quality digital tire pressure gauge and using it every few days, especially after a significant change in weather or altitude, is one of the smartest and cheapest forms of insurance for your road trip.
Adapting your load to shifting micro-climates
A cross-country road trip is a journey through a series of rapidly changing environments. You might start in the humid heat of the East Coast, traverse the dry plains, climb through the cold Rocky Mountains, and descend into the desert heat of the Southwest, all within a few days. Your packing strategy must be as dynamic as the weather. The challenge is not just having the right gear, but having the right gear accessible at the right time. Having your winter jacket buried under camping equipment when you hit an unexpected snow flurry in Colorado is a scenario to be avoided.
This requires an “environmental volatility” packing strategy. Before you leave, map your route and anticipate the major climate zones you’ll be passing through. Then, layer your packed gear accordingly. If you know you’re heading from a warm climate to a cold one, the box or bag containing your warmer clothes, hats, and gloves should be positioned as one of the last items in, making it one of the first you can access. This is a practical application of your tiered accessibility system, but applied to climate instead of emergencies.
Heat-sensitive items also require special consideration. Electronics, medications, and certain foods (hello, melted chocolate) should never be left in a hot car and should be packed in insulated bags. These bags can be kept in the climate-controlled passenger cabin for easy access and protection from temperature extremes.
Case Study: In-Car Micro-Climate Management
For travelers on extended trips or those passing through regions with unpredictable weather, managing the micro-climate both inside and outside the car is key. On a long journey where the vehicle might be parked outdoors overnight in various conditions, a simple waterproof car cover can be a surprisingly smart investment. It protects the vehicle from rain, dust, and damaging UV rays. This is especially helpful on longer trips when leaving the car unattended for extended periods, as it also serves as a deterrent to theft by keeping the contents of your car out of sight.
By using weather apps to check conditions along your route, you can proactively adjust your packing. If heavy rain is forecast for the next state, move your rain gear to a more accessible location during your next fuel stop. This foresight transforms your car from a static container into an adaptive, climate-ready vessel.
Key takeaways
- Weight distribution is a safety feature: Proper placement of heavy items low and central is more critical for vehicle handling and braking than simply maximizing space.
- Accessibility prevents chaos: A tiered system for your gear—Cabin, Immediate, and Deep Storage—ensures you can get what you need without unpacking the entire car on the roadside.
- External storage has consequences: While roof boxes or hitch racks add space, they come with significant trade-offs in fuel economy, handling, and cost that must be weighed carefully.
Anticipating the unexpected to stay safe on the road
The ultimate goal of a well-engineered packing strategy extends beyond comfort and convenience; it is a fundamental component of road safety. Every decision you make about what to bring and where to put it has a direct impact on your ability to drive safely and react to the unpredictable actions of others. A car that is balanced, where visibility is unobstructed, and where loose items are secured, is a car that is prepared for the unexpected.
Think of your well-packed car as creating a defensive “bubble.” Proper weight distribution ensures your car handles predictably in an emergency swerve. Keeping items below the window line gives you the 360-degree visibility needed to spot a hazard early. Securing every single item, from luggage in the trunk to a water bottle in the cabin, prevents them from becoming dangerous projectiles during a sudden stop. As one expert puts it, this preparation is a key element of safety.
Securing luggage, maintaining vehicle balance and keeping clear lines of sight from the driver’s seat are key elements in packing your car safely for the long drive. Do not pack things too high – items packed too high may obstruct the driver’s view through the rear-view mirror. Also, items packed too high could shift forward and injure those in the back seat if you should stop suddenly.
– Chris Hayes, Travelers Insurance Risk Control
This mindset transforms packing from a chore into an act of responsibility. By taking the time to plan your load with the precision of an engineer, you are not just organizing your stuff; you are actively reducing risk and preparing yourself to handle any challenge the road throws at you. A safe journey begins long before you turn the key.
Now that you have the framework for a perfectly packed vehicle, the next logical step is to apply these principles to your own gear and your specific trip. Start by creating your inventory and mapping out your accessibility tiers today.